How to Upload Pixel Art to Unity
Take your 2D development feel to the next level and explore Unity'southward native suite of 2d tools.
Retro games with simple mechanics and pixelated graphics can evoke fond memories for veteran gamers, while also being outgoing to younger audiences. Nowadays, many games are labeled equally "retro", but it takes effort and planning to create a title that truly has that nostalgic look and feel. That'due south why we've invited the folks from Mega True cat Studios to help us talk nearly the topic. In this blog post, we'll be covering everything you need to create authentic fine art for NES-fashion games, including important Unity settings, graphics structures, and color palettes. Go our sample project and follow along!


Mega Cat Studios, out of Pittsburgh, Pennsylvania, has turned the creation of highly accurate retro games into an fine art form. And then much so, in fact, that several of their titles can also be acquired in cartridge grade and played on retro consoles similar the Sega Genesis.

Unity workflows for maximum retro-ocity
Recent additions to the Unity workflows have fabricated it a well-suited surround for creating your retro games. The 2D Tilemap system has been made fifty-fifty better and now supports filigree, hex, and isometric tilemaps! Additionally, you can use the new Pixel Perfect Photographic camera component to accomplish consistent pixel-based movement and visuals. Y'all tin can even go so far as to use the Post Processing Stack to add all sorts of cool retro screen effects. Before whatever of this work can be done, however, your assets volition demand to be imported and set up correctly.
Preparing sprite assets
Our avails offset need a right configuration to be crisp and clear. For each nugget you're using, select the asset in the Projection view, then alter the following settings in the inspector:
- Filter mode changed to 'Betoken'
- Compression changed to 'None

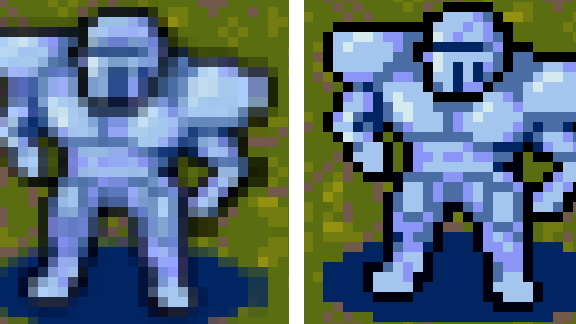
Other filter modes result in a slightly blurred paradigm, which ruins the crisp pixel-fine art style we're looking for. If compression is used, the data of the image will exist compressed which results in some loss of accuracy to the original. This is important to notation, as it can cause some pixels to alter color, possibly resulting in a alter to the overall color palette itself. The fewer colors and the smaller your sprite, the greater the visual divergence compression causes. Here's a comparing betwixt normal compression (default) and no compression.

Another thing to exist aware of is the Max Size setting for the image in the Inspector. If your sprite paradigm has a size on whatsoever centrality greater than the 'Max Size' property (2048 by default) it will exist automatically resized to the max size. This will usually result in some loss of quality and cause the epitome to become blurry. Since some hardware volition non properly support textures over 2048 on either axis, it is a skilful thought to endeavour to stay within that limit.
Above, is a sprite from a spritesheet that was 2208 on i centrality with max size set at 2048. As you can run into, increasing the Max Size belongings to 4096 allows the image to be sized appropriately and avert a loss of quality.
Finally, when preparing your sprite or sprite sail, make sure you fix the pivot unit mode to 'Pixels' instead of 'Normalized'.
![]()
This is and then the sprite's pin signal volition be based upon pixels rather than a shine range from 0 to i beyond each axis of the image. If the sprite were to not pivot from a pixel exactly, nosotros would lose pixel-perfectness. Pivots can be set for sprites in the Sprite Editor, which can exist opened from the Inspector when yous accept a sprite nugget selected.

Installing the second Pixel Perfect package
With avails prepared, we can set our camera up to exist "pixel-perfect". A pixel-perfect result will look clean and crisp. Telltale signs of pixel art which aren't displayed as pixel-perfect includes blurriness (aliasing), and some pixels appearing rectangular when they should be square.
The 2d Pixel Perfect package can be imported through the Package Managing director in Unity. Click the 'Window' carte du jour in the toolbar followed past 'Parcel Manager'. In the new window, click 'Advanced' and make certain y'all accept enabled 'Show preview packages'. Select second Pixel Perfect from the list on the left, and select install on the summit right of the window.

That's it. Now you are ready to begin using the pixel-perfect camera component.
A high level of pixel-perfect-itude
The Pixel Perfect Photographic camera component is added to and augments Unity's Camera component. To add together it, become to your principal photographic camera and add together the Pixel Perfect Camera component to it. If the Pixel Perfect Camera component option is not at that place, follow the previously stated instructions to showtime import it into the projection.

Now let's look at the settings nosotros have available.

Start, I recommend checking 'Run In Edit Mode' and setting the display aspect ratio in the Game view to 'Free Aspect' and then y'all can resize the game view freely. The component will display helpful letters in the game view explaining if the display is not pixel-perfect at any given resolution.

At present, yous can go through each setting to see what they practice and how they affect the look of your game!
- Avails Pixels Per Unit - This field is in reference to the setting yous can select in the inspector for each asset. As a general dominion of thumb, each nugget that will exist used in the game's world space should use the same pixels per unit (PPU), and you'd put that value hither as well. If your game world exists every bit a grid of tiles and sprites, with each being 16 pixels by sixteen pixels, a PPU of 16 would make sense - each tile of the filigree would be ane unit in worldspace coordinates. Make sure you put your chosen PPU here.
- Reference Resolution - Set this to the resolution that y'all intend all of your assets to be viewed at. If yous want a retro wait, this unremarkably means a very pocket-sized resolution. For case, the native resolution for the Sega Genesis is 320x224. When porting a game from Sega Genesis, nosotros would apply a reference resolution of 320x224. For general sixteen:ix usage, 320x180, every bit well equally, 398x224 (if you want to keep the vertical resolution instead) should piece of work well.
- Upscale Render Texture - This causes the scene to be rendered at as close to the reference resolution as possible and then be upscaled to the fit the actual display size. Considering this setting results in a filled screen, nosotros recommend it if you desire a full-screen pixel-perfect experience with no margins. 'Upscale Render Texture' volition likewise significantly affect how sprites await when rotated.

- Pixel Snapping (only available with Upscale Render Texture disabled) - With this enabled, sprite renderers volition exist snapped to a world-space grid automatically, where the grid'due south size is based off of your called PPU. Annotation that this does non really affect any object'southward transform positions. As a result, you lot can nevertheless smoothly interpolate objects betwixt positions, simply the visual movement will remain pixel-perfect and snappy.
- Example:

- Crop Frame (10 and Y) - This crops the viewed region of worldspace to exactly match the reference resolution, and adds black margins to the display to make full the gaps at the edges of the screen.
- Stretch Fill up - Becomes available if you enable both ten and y for Crop Frame. This causes the camera to calibration to the game view to fit the screen in a fashion that preserves aspect ratio. Because this scaling won't happen only in whole number multiples of the reference resolution, information technology will cause pixel-perfectness to be lost at any resolution which is not a whole number multiple of the reference resolution. The advantage here is that fifty-fifty though you lose pixel-perfectness for many resolutions, you won't have the black bar margins and will instead have a fully filled screen. Note that although blurring often occurs from stretch fill, the usual alert brandish message does not show up.

Recommendations on using the Pixel Perfect Camera
If you lot desire a pixel-perfect and snappy brandish that will work for a variety of utilise-case, I recommend:
- Use a reference resolution that will never be bigger than a histrion'due south window resolution (such as 320x180).
- Enable or Disable Upscale Render Texture
- Enable information technology if you will use rotations exterior of 90, 180, and 270 and if you lot prefer the visual effect it has on rotated sprites.
- Upscaled render texture can outcome in a non-pixel-perfect paradigm at some resolutions, depending on your reference resolution. Experiment with this and different screen resolutions using 'Run in Edit Mode' enabled on the Pixel. Perfect Camera component to make up one's mind whether this is an issue for your resolution. If you tin get this to produce a pixel-perfect image at all target resolutions, this will result in the best full-screen pixel-perfect experience.
- Enable or Disable Pixel Snapping equally you prefer
- This is more personal preference than anything. Without snapping, yous accept much smoother movement, but pixels can be out of alignment.
- Enable Crop Frame X and/or Y if not using Upscale Render Texture
- If you can't consistently get a pixel-perfect effect with upscale return texture, cropping Ten and/or Y will ensure a pixel-perfect epitome for any resolution greater than the reference resolution, but creates big margins at the edges of the screen for some resolutions.
- Disable Stretch Make full
We recommend setting the camera to be optimized for xvi:9 aspect ratio viewing, including reference resolution if possible. At the time of writing, almost gamers play on 16:9 monitors, and in 1920x1080 resolution. For instance, 320x180 reference resolution is 16:ix, and and so information technology will take no black bar margins when played at 1920x1080 or any resolution which is an fifty-fifty multiple of 320x180, such as 1280x720.
In Unity'south toolbar, yous can get nether Edit > Project Settings > Player and limit the aspect ratios that the game volition support. If y'all notice a particular configuration works just as you want in the ratio you're targeting only looks bad in some particular aspect ratios, you can forbid the window from being at those ratios here. Yet, keep in heed that not all users volition have a display setup that will piece of work well with your limitations, then this is not recommended. Instead, enable cropping so these users volition have margins, rather than having to play in a resolution which doesn't fit their screen.
Creating Accurate NES Styled Artwork
Now that we've covered how to ready Unity upwardly for pixel-perfect art, permit's look at the basics of creating artwork for games that follow the restrictions of the classic Nintendo Entertainment Organisation. This console generation places a large number of restrictions on the artists trying to create an authentic image. These restrictions include things like palettes used and the size and corporeality of objects on a screen. Additionally, information technology is import to keep in mind is the reference resolution of 256x240 when "targeting" this console.
Palettes
When creating artwork that is genuine to the NES, there are a host of restrictions that the artist will have to follow. Some of these will exist consistent no affair what retro console an creative person is attempting to emulate, while many others are specific to the NES itself. The first, and possibly the most of import of these restrictions involve the mode color palettes are used in an epitome. The NES is adequately unique when it comes to its color palette considering the full-color palette of the console is hardcoded into the console. The NES chooses which colors to use in an image by sending a serial of values to the graphics processor on the NES, and then the graphics processor returns the colors associated with those values. Below is an image of the NES' colour palette:

These colors cannot exist changed due to the fact that they are part of the console themselves. Every game you lot take ever seen for this panel uses combinations of these colors in order to brand their images.
Sub-Palettes
To create the combinations that are used in the game, sub-palettes are created and assigned to either the in-game sprites or groundwork elements. The NES breaks its palette up into sub-palettes that can be assigned to sprites and backgrounds. Each sub-palette includes one common color that is used across all of the sub-palettes and three unique colors. Information technology is capable of loading iv sub-palettes for the backgrounds and four sub-palettes for the sprites. In the instance of the sprites, the common color at the beginning of each sub-palette is treated as transparency.

This is an example of a series of sub-palettes that are being used in a game. The top row represents the background sub-palettes and the lesser row represents the sprite sub-palettes. In this example, black is beingness used as the common color that is shared across all of the sub-palettes. Because the common color is treated as transparency on sprites, a second black palette entry is needed to exist made for the sprite sub-palettes, in order to use it every bit a visible color.
Sub-Palette Assignment
The restrictions on palette employ get even tighter as the artist moves on to how the palettes are used in the game. To explain this, there needs to exist further discussion on how retro consoles store, use, and display fine art. The artwork in whatever retro panel is stored in the game as 8x8 px tiles. Using this tile-based arroyo allows artists to save space past reusing tiles for different things. (For example, pieces of a sidewalk can be repurposed and used to make the ledge on a building). The other important thing to note about tile based storage is that colour information is generally non saved with the graphics. All of the tiles are saved with a monochromatic palette. This way, whenever a tile is displayed in the game it can have a sub-palette assigned to information technology, allowing the same tile to exist simultaneously displayed on screen with different sub-palettes This is significant when creating artwork that is true to a retro panel on a modern platform because it affects how you assign palettes to the artwork.
The NES assigns palettes to sprites and backgrounds differently. Information technology assigns sub-palettes for sprites on a tile-by-tile basis. That means that every 8x8 tile in a sprite can have one of the 4 sprite sub-palettes assigned to information technology.

Backgrounds, on the other paw, are much more restrictive. Backgrounds assign their palettes in 16x16 chunks. The sub-palette assignments for an entire screen'south worth of background are referred to as Attribute Tables. These Attribute Tables are the reason why well-nigh retro artwork involves heavy use of repeating tiled segments. Those segments tend to be equanimous of 16x16 tiles and so that they neatly fit into an Attribute Table. Despite being in response to a hardware restriction, this 16x16 tile-based approach to backgrounds concluded upwardly being a defining characteristic of retro artwork and is absolutely necessary when trying to recreate information technology.

Sprite Layering
Fifty-fifty though artists are gratis to apply different sub-palettes for each 8x8 tile of a sprite, they might notice themselves in a situation where they want to accept a greater colour depth in a sprite than what is already available. This is where sprite layering can come in. Sprite layering is just splitting a sprite upwards into two carve up sprites and then placing them on pinnacle of each other. This allows artists to circumvent the one sub-palette per 8x8 tile restriction. Doing this will essentially permit artists to double the number of colors that can exist used in a single 8x8 area. The merely major drawback of doing this is sprite rendering limits. The NES is only capable of displaying 64 8x8 sprite tiles on screen at once, and only 8 sprite tiles in the same horizontal line with one another. One time those numbers are reached, any further sprite tiles will not be rendered on screen. This is why many NES games would flicker sprites when in that location was a lot of them on the screen at once. That way, information technology's simply displaying certain sprites on alternating frames. These limits are something artists need to be mindful of when they are layering sprites on height of each other considering while information technology doubles the number of colors, it also doubles the number of sprite tiles on the same horizontal line.

Sprite layering can also exist done with the groundwork to get around the Attribute Table limits. This play a joke on is generally used for static images, similar story screens and character portraits, to requite them a much greater color depth. In order to do this, the creative person would depict role of the paradigm as the groundwork and then layer sprites on top of information technology to make full in the rest.

Graphics Banks
To explain the next major restriction of the NES, kickoff, we demand to circle dorsum to the fact that graphics are stored in tiles. Graphics tiles are stored in 256 tile pages and tiles from these pages cannot be loaded into VRAM in different locations, so information technology becomes difficult to mix and match tiles from unlike pages on the fly. The NES' VRAM is just capable of displaying 512 of these tiles at once. Beyond only that brake, it splits the tiles in half for sprites and background. That means it is only capable of displaying 256 sprite tiles and 256 groundwork tiles at any given moment. This tin can become very restrictive if the artist wants to brandish a big variety of sprites and background elements.

In order to combat this limitation, the NES has a characteristic that allows the artist to break each page upward into partial pages chosen banks. And so while the NES isn't capable of loading individual tiles from various points in the graphics data, it is capable of loading different sections of a folio at unlike times. For nearly games, these banks are either going to be 1K or 2K banks. A 1K depository financial institution equals i-fourth of a page or 64 tiles, while a 2K bank is half of a page or 128 tiles. The artist must determine if they want to reserve the use of each type of depository financial institution for either Sprites or Background elements considering both types of banks need to be utilized. That means that you cannot have 1K banks for both the sprites and backgrounds. 1 page needs to use 1K banks and the other needs to use 2K. Generally speaking, most games tend to use 1K banks for the sprites and 2K banks for the backgrounds because background tilesets tend to be more static and demand less in terms of on the fly variety.

The usefulness of 1K banks for sprites is pretty significant. If the thespian sprite has a big range of animations that will not fit in a single page along with all of the other sprites that need to exist loaded, private actions tin be saved in 1K banks and then swapped between depending on what action is happening on screen. It as well allows for a larger variety of sprites that can be used in a unmarried area of a game. For instance, if the player is to encounter six different kinds of enemies in an area of a game, but the sprite page but allows for the actor and three other types of sprites, so when one enemy blazon is cleared off of the screen, the game can swap one of the enemy banks in for a new enemy type.
Ane of the only major drawbacks of using 1K banks for sprites and 2K banks for backgrounds is how the NES handles background animation. In order to animate a background chemical element for a NES game, the creative person has to create duplicate banks of the animated background elements. Each new indistinguishable bank volition incorporate the adjacent frame of blitheness for each of the animated elements. These banks are and then swapped in and out 1 at a time like a flip-book, in order to create the blitheness. If the artist is using half-page banks for the backgrounds, and then storing all of those duplicate banks can accept up a lot of space. I way to circumvent this though is to put all of the animated groundwork elements for the entire game into a single bank. But, that as well leaves the artist with the brake of only having 128 tiles left over for the static elements for each groundwork. Information technology is up to the artist to decide the best class of action when deciding what kinds of banks they are going to use for the art.
Layering Tricks
Many games from that era will employ tricks to create effects like parallax scrolling in the background, but these too present the artists and designers with a challenge. While the later 16-bit consoles allowed for multiple background layers, this is not an option on the NES. All backgrounds are a single flattened image. In lodge to create a sense of depth and layering, different programming tricks were used. In club to create a parallax background, for example, the developer is able to ready a register that can tell when a certain horizontal line (known equally a raster line) is existence rendered on the screen. They tin then use that register to control the speed and direction that the screen is scrolling in. By using that, they can create a horizontal row of the background that scrolls at a different speed as the balance of the background. The trick for the artists and designers at this point is to be mindful that the background is all the same one apartment image. If a platform or any other element that is supposed to be "in front" of that slower moving groundwork is placed in that region, then it too will scroll slower than the balance of the prototype. That means that designers demand to be mindful of where they are placing background elements in the scene, and artists need to create the groundwork in a way that the result will exist seamless.

In that location's also another pull a fast one on for artists that want to accept one of their groundwork elements appear in the foreground. On the NES, developers are able to prepare a sprite's priority to be less than zero. When this is done, it will cause the sprite to exist displayed backside whatever non-transparent groundwork pixels. Sprite priorities tin exist modified and triggered on the fly as well, assuasive for sure elements to change a sprite'south priority as needed.
Conclusion
When someone is trying to create a project that is accurate to a retro console, there are many technical considerations that they need to go on in mind that might not exist things that modern evolution has to worry about. Due to the way older machines would render images and handle having modest amounts of room to maneuver with the CPU and GPU, the designers would have to call back creatively to work around the hardware's limitations. In the modern age, it becomes important to learn about those limitations and the techniques, in order to truly recreate the expect and design of games from that era. In the next mail service, nosotros volition look at the blueprint limitations imposed past the sixteen-bit era too every bit the Unity piece of work needed to go that truly "one-time TV" feel. The 2D Pixel Perfect guide for sixteen bits retro visuals is now available here.
---
First time designing levels with Tilemap? Explore worldbuilding in second in this beginner tutorial on Unity Acquire.
Source: https://blog.unity.com/technology/2d-pixel-perfect-how-to-set-up-your-unity-project-for-retro-8-bits-games
0 Response to "How to Upload Pixel Art to Unity"
Post a Comment